Showing posts with label Crafts. Show all posts

Friday, April 3, 2009

Playing With Paper


I'm always impressed at what people can create with scissors, paper, glue and a little (ok, a lot!) of patience. Brooke Meyenberg of Little Retreats is the creative force behind these darling designs. Each item is handcrafted, and each is unique. Here are a few of my favorite creations (but they are all fabulous!).

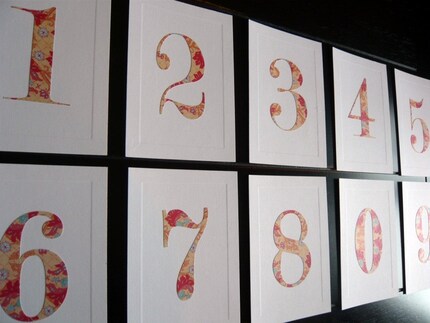
Since weddings are on my mind lately as I am getting geared up for the wedding season, I immediately saw the stylish numbers above and thought they would be perfect for table numbers at a reception. Or for this year's Annual Women's Tea (Mom, if you're reading this take notes :)).

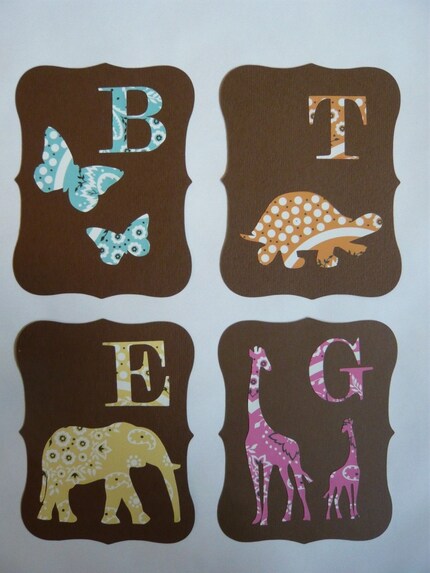
The letter/animal cards would be so sweet in a nursery!

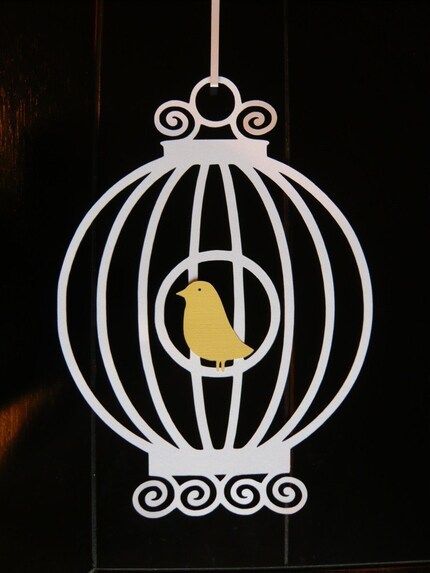
And don't even get me started on how adorable I think the bird cage is! The little pale yellow bird brings spring into even thee dreariest of places. Ahem...my desk! Hang them in a window, on your wall, where ever your little heart desires.

Thursday, January 15, 2009

Stick It To Me

(Photo courtesy of Canadian Family Magazine)

This is a new spin on common fridge decor. It's a new creative way to display what's going on in your life. From your kids artwork to the invitation for your next shindig to a newspaper slipping to pictures of your friends. You can buy these silver trays at almost any antique store and sometimes at thrift stores. Simply mount to the wall using a couple of screws (you'll want to pre-drill a couple holes into the tray before mounting), and use your favorite magnets to display the items.

If you're feeling extra crafty and creative, here are some adorable magnets from How About Orange that you can make at home. This craft will make you think twice about tossing out your old catalogs!(Photo courtesy of How About Orange)

Monday, December 8, 2008

The Countdown Has Begun!

When I was growing up every day in December held a new surprise. A treasure. Sometimes small, sometimes big. These special treats were from our advent calendar. It was a snow covered house made out of paper boxes. Every day my sister and I would take turns opening the box for that day. Some days there would be a yummy piece of candy, and other days there would be the first clue to an intricate scavenger hunt leading to a holiday book or toy of some sort.

The advent calendar is special not only for the treats it brings, but also it's a daily reminder to have joy throughout the entire season. They originated from the German Lutherans who would count down the 24 days of Advent with a simple chalk mark. Now we are a bit more modern and detailed in our design. There are SO MANY creative options out there, but here are a few of my favorite advent calendars both to purchase or to create:

(Photo courtesy of Kaboose)

Santa's Advent Beard: A classic. Fill in Santa's beard with one cotton ball each day.


(Photo courtesy of Skip To My Lou)

Little Birdie Advent Calendar: A modern twist, and a fun DIY project.


(Photo courtesy of Target)

Gift Advent Calendar: A gift a day keeps the doctor away...


(Photo courtesy of Target)

Mirrored Advent Calendar: Add a little glamour to your day.

(Photo courtesy of Alpha Mom)

Paper Cup Advent Calendar: Now I realize this is a calendar for November using leftover Halloween candy, but use some red and green tissue paper and you're good to go for advent.

Monday, November 10, 2008

Comfort Week - Heating Pad How-To

As the weather starts to turn colder, I'm always looking for a way to get extra warm and cozy. I love wrapping a heating pad around my neck after a long day at work. However, I've never found one in as stylish a fabric or that smelled as good as the one I made. It may look complicated, but it can be accomplished in a few easy steps.

What you'll need:
-fabric (about 1/2 a yard)
-sewing machine
-iron
-thread and needle
-scissors
-rice
-your favorite essential oil (I chose lavender)


How to:
1. In a large bowl, mix rice with your essential oil. Add as much or as little oil as you prefer. Remember that the oil will smell stronger when you heat it up.

2. Fold the fabric in half (right sides together) and cut to your desired size. Note: I made mine bigger because I intended to use it more for my back rather then my neck.

3. Sew one short side and one long side with a 1/4" seam allowance.

4. Press seams apart and clip corners

5. Turn right side out.

6. Fill bag about 2/3 way with rice and essential oil mixture.

7. Hand sew the top to close.

Heat in the microwave for about 30 seconds to 1 minute and begin to relax.

Thursday, November 6, 2008

The Big Ugly Desk Chair

My guest room is full of relaxing, soothing tones of beige, pale sage green, warm pinks and blues. It is a tranquil place that I love welcoming guests into. However, since we live in an apartment my guest room is also the office. So sitting at the desk, smack dab in the middle of the room is a big black ugly desk chair. I have been contemplating my design options, but with a tight budget getting a new chair is not in the cards. Then I came across this post from Apartment Therapy's Re-Nest.
They have completely transformed a plain old office chair into a much more stylish and chic version. All they have done is recover the existing chair with new modern fabric. I'm thinking I may need to make a trip to the fabric store!