Showing posts with label Cooking. Show all posts

Thursday, April 9, 2009

Here Comes the Sun, Da Da Da-Da

The past few days have been b-e-a-u-t-i-f-u-l outside. In true Seattle fashion, people have been breaking out the shorts and the flip flops and have been flocking to the nearest park or any outdoor area in hopes of soaking up as many sun rays as possible. I feel a bit like a mole coming out from underground and have become suddenly aware of how pale I am...if you are going to look at me you should put on sunglasses first. It's that bad.

In honor of the sun, hubby and I flared up the BBQ for the first time this year. Oh yum! It was an amazing meal. We ate with the door wide open.

The best part of the meal were these potato wedges. So easy and so delicious! Line a jelly roll pan with parchment paper (this will ensure the wedges won't stick to the pan and helps make clean up a breeze). Scrub the potatoes very well and cut into wedges. Put into a bowl and mix with olive oil, salt, pepper and smoked paprika. Mix well and then lay potatoes, skin side down, in a single layer on the jelly roll sheet. Bake in the oven at 390 degrees for about 25 minutes. You want them to start turning golden and to get a little crispy.
Pull them out and sprinkle with truffle salt. Truffle salt isn't for everyone, but I happen to think it is spectacular. It adds an earthy flavor that is very unique. Serve the potato wedges immediately with a side of ketchup (or ranch dressing in our house).

I hope all of you other Seattlites have been enjoying the sun while it lasts!

Tuesday, March 10, 2009

Chicken Pot Pie with a Side of Girl Scout Cookies

(Photo by HouseLewis )

Yesterday was my Mom's birthday, and to celebrate my sister, dad and I combined efforts to make dinner. My contribution was homemade chicken pot pies. They were D-E-L-I-C-I-O-U-S! The recipe I used is below. The original recipe is intended for making a large pie in a 9x13 dish. However, I wanted to serve mine as individual servings in ramekin dishes so I made some alterations. To see the original recipe check it out here.

Tonight I made 4 more pot pies with the leftover filling. I made a 1/4 of the crust recipe and decided to only make crust for the tops of the pies. I also used whole wheat flour. It was a healthier option and tasted really good.

The next time I make this dinner I'll probably make only 1/2 of the recipe. The full recipe made enough for about 13-14 ramekin size pot pies! My sister had the great idea of using the extra filling for a soup...yum! (Note: 1/2 of the crust recipe was enough for 7 ramekins with crust covering the inside and the top of the pies.)

Ingredients

Crust:

  • 3 cups all-purpose flour
  • 2 teaspoons salt
  • 3 sticks frozen unsalted butter, cut into small bits
  • 1/2 cup ice water mixed with 2 tablespoons white vinegar

Sauce:

  • 1/2 stick unsalted butter
  • 1/3 cup all-purpose flour (plus a little extra)
  • 2 cups chicken stock
  • 1 cup heavy cream
  • 1 cup milk
  • 1 tablespoon ground sage
  • 1 teaspoon ground nutmeg
  • Salt
  • Freshly ground black pepper

Filling:

  • 1 (8-ounce) box frozen green peas
  • 1 1/2 cups sauteed button mushrooms
  • 2 cups cooked, diced carrots
  • 3/4 cup frozen corn
  • 1/2 cup diced celery
  • 4 medium potatoes, parboiled and diced, with the skin on
  • 1 (8-ounce) box frozen pearl onions
  • About 7-ounces chicken pulled off a cooked rotisserie chicken
  • Nonstick cooking spray

Glaze:

  • 2 egg yolks
  • 2 tablespoons cream
  • 1 teaspoon water

Directions

To make the crust: Mix flour, salt and butter together until well combined. Slowly add in water/vinegar mixture until dough comes together. Dump out onto saran wrap, mold into two balls, cover and place in the refrigerator for 30 minutes.

Dump out the dough and form 2 balls. Wrap in plastic and refrigerate for 30 minutes.

Preheat the oven to 350 degrees F.

In a large saucepan, heat the butter until foamy. Add the flour, whisking constantly until blended. Remove from the heat and whisk in the stock, cream and milk.

Put the pan back on low heat until the mixture has thickened. Add more flour as needed, but you don't want the sauce to be too thick. Taste for saltiness. Whisk in sage, nutmeg, salt (if necessary), and pepper. Remove from the heat, and in a large bowl, combine with the vegetables and chicken. Set aside.

Fill oven-safe ramekins with the chicken and sauce mixture.

Roll out the crust and cut a circle slightly larger than the ramekin. Place on top of the chicken mix. Crimp the edges with your fingers.

Mix the egg yolks, cream and water to form a glaze and brush on the top of the pies.

Place in the oven and cook for about 30 minutes (If needed, increase oven temp to 400 degrees F). Cook until the crust is golden and slightly crunchy. The filling should be bubbly.

Let pie rest for 10 minutes before serving.


Oh yeah...The side of girl scout cookies! My mom gave me some girl scout cookies and I put them in the freezer to try and stop myself from eating them. This was not a good idea because the darn cookies just taste even better when their frozen!

Tuesday, February 24, 2009

Chocolate + Coffee = Yum!


(Photo a HouseLewis Original)

Most days I have two little treats. The first is a cup of coffee with a little cream and sugar in the morning. I prefer to sip while sitting in a chair overlooking the morning fog on the lake...but my desk chair overlooking my morning emails will have to do. My second treat is a piece of chocolate in the afternoon. It's the perfect pick-me-up as the day begins to drag.

The other day while working on another cooking project (which you'll hear about very soon), I decided to make a combination of these two treats and created chocolate covered coffee beans. They were so simple and SO delicious!

Chocolate Covered Coffee Beans
1/2 cup whole coffee beans
3/4 cup chocolate chips

1. Melt chocolate in a double boiler (or if you're like me and don't have a double boiler, boil water in a sauce pan and melt chocolate in a glass bowl placed on top of the sauce pan).

2. Pour coffee beans into melted chocolate. Stir until coated.

3. Remove and place on wax paper covered cookie sheet. Separate beans as best you can so they are not touching.

4. Place cookie sheet in the fridge for 20 minutes and then enjoy!

5. Store in an airtight container.

Friday, December 19, 2008

Walking In A Winter Wonderland

Yesterday most of the Northwest was covered in a blanket of powdery white. My hubby and I ventured out on foot to the grocery store so I could spend the afternoon making homemade Challah bread. It's such an easy bread to make, but you'll be sure to impress people with this golden braid. My favorite recipe is from the Betty Crocker's Cookbook Bridal Edition.
With blizzard warnings in affect over most of Western Washington, I'm staying home again instead of slip sliding around on the roads. So I'm getting cozy with a cup of tea, watching non-stop Christmas movies and probably working on my next knitting project.
I am going to be spending Christmas in Alaska this year, so I'll be taking a short break from blogging. Don't worry though...I'll be back in the new year!
Merry Christmas!

Thursday, November 13, 2008

Comfort Week - All Time Favorite Comfort Food

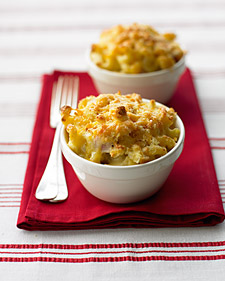
(Photo Courtesy of Martha Stewart)
What is "comfort week" without some comfort food?! Well today I'm going to share my all time favorite comfort food recipe with you, but I'm cheating a little and not using a picture I took myself. I made this meal recently, but it was eaten before I took any pictures! Yes, it's that good!


by Rachael Ray

Ingredients:
1 pound macaroni with lines, such as tubatini or mini penne rigate
Salt
1 tablespoon extra virgin olive oil, 1 turn of the pan
2 tablespoons butter
1/2 medium onion
2 tablespoons chopped fresh thyme leaves, plus a few sprigs for garnish
3 tablespoons all-purpose flour
2 cups chicken stock
1 box frozen cooked butter nut squash (10 ounces), defrosted
1 cup cream or half-and-half
2 cups sharp cheddar (8 ounces), grated
1/2 cup grated Parmigiano Reggiano, a couple of handfuls
1/4 teaspoon ground nutmeg, eyeball it
Black pepper

Preparation:
Heat a pot of water to boil for the pasta. Salt the water then add the pasta and cook to al dente or, with a bite to it.
While pasta cooks, heat a medium heavy bottomed pot over medium heat. Add the EVOO and butter. When the butter melts into the oil, add the thyme and grate the onion directly into the pot with a hand held grater or Microplane. Cook the grated onion in butter and oil 1-2 minutes, then add flour and cook together 1-2 more minutes. Whisk in stock, then combine with butternut squash until warmed through and smooth. Stir in cream or half-and-half and bring sauce to a bubble. Stir in cheeses in a figure 8 motion and season the completed sauce with salt, nutmeg and pepper. Taste to adjust seasonings.
Drain cooked pasta well and combine with sauce.

Note: I make a few changes to the recipe. I use basil rather than thyme and add cooked chicken. I also add a variety of veggies I have on hand such as mushrooms or zucchini.

In Rachael Ray's words "Yum-o!"

Wednesday, October 29, 2008

Daring Bakers Challenge - Pizza, Pizza!

This month I took on a new challenge and joined the Daring Bakers. It's an online group that takes on a baking challenge each month. The rules are simple: follow the original recipe given to you, add your own creative twist, keep the challenge ultra top secret, and most of all have fun! For more info on this group check out there website here: The Daring Bakers.
Now for the challenge: This month we were asked to bake a simple pizza crust. We had to use a sauce of some kind, but the rest of the toppings were up to our imagination.
Oh yeah, they also told us we had to toss the dough and capture a picture of it. I quickly found that tossing wasn't my forte, but I sure had fun doing it. (Thanks Michelle for taking the picture! :))

Savory Pizza

The Dough: I'll have to get back to you with a link to the recipe. For one pizza crust I stuffed it with a tablespoon of basil and a small handful of sun dried tomatoes. This was a hit!

As promised, here is the recipe:

~ BASIC PIZZA DOUGH ~

Original recipe taken from “The Bread Baker’s Apprentice” by Peter Reinhart.

Makes 6 pizza crusts (about 9-12 inches/23-30 cm in diameter).

Ingredients: 4 1/2 Cups (20 1/4 ounces/607.5 g) Unbleached high-gluten (%14) bread flour or all purpose flour, chilled

1 3/4 Tsp Salt1 Tsp Instant yeast

1/4 Cup (2 ounces/60g) Olive oil or vegetable oil

1 3/4 Cups (14 ounces/420g or 420ml)

Water, ice cold (40° F/4.5° C)

1 Tb sugar Cornmeal for dusting

DAY ONE 1. Mix together the flour, salt and instant yeast in a big bowl (or in the bowl of your stand mixer).

2. Add the oil, sugar and cold water and mix well (with the help of a large wooden spoon or with the paddle attachment, on low speed) in order to form a sticky ball of dough. On a clean surface, knead for about 5-7 minutes, until the dough is smooth and the ingredients are homogeneously distributed. If it is too wet, add a little flour (not too much, though) and if it is too dry add 1 or 2 teaspoons extra water.NOTE: If you are using an electric mixer, switch to the dough hook and mix on medium speed for the same amount of time.The dough should clear the sides of the bowl but stick to the bottom of the bowl. If the dough is too wet, sprinkle in a little more flour, so that it clears the sides. If, on the contrary, it clears the bottom of the bowl, dribble in a teaspoon or two of cold water.The finished dough should be springy, elastic, and sticky, not just tacky, and register 50°-55° F/10°-13° C.

3. Flour a work surface or counter. Line a jelly pan with baking paper/parchment. Lightly oil the paper.

4. With the help of a metal or plastic dough scraper, cut the dough into 6 equal pieces (or larger if you want to make larger pizzas).NOTE: To avoid the dough from sticking to the scraper, dip the scraper into water between cuts.

5. Sprinkle some flour over the dough. Make sure your hands are dry and then flour them. Gently round each piece into a ball.NOTE: If the dough sticks to your hands, then dip your hands into the flour again.

6. Transfer the dough balls to the lined jelly pan and mist them generously with spray oil. Slip the pan into plastic bag or enclose in plastic food wrap.

7. Put the pan into the refrigerator and let the dough rest overnight or for up to thee days.NOTE: You can store the dough balls in a zippered freezer bag if you want to save some of the dough for any future baking. In that case, pour some oil(a few tablespooons only) in a medium bowl and dip each dough ball into the oil, so that it is completely covered in oil. Then put each ball into a separate bag. Store the bags in the freezer for no longer than 3 months. The day before you plan to make pizza, remember to transfer the dough balls from the freezer to the refrigerator.

DAY TWO 8. On the day you plan to eat pizza, exactly 2 hours before you make it, remove the desired number of dough balls from the refrigerator. Dust the counter with flour and spray lightly with oil. Place the dough balls on a floured surface and sprinkle them with flour. Dust your hands with flour and delicately press the dough into disks about 1/2 inch/1.3 cm thick and 5 inches/12.7 cm in diameter. Sprinkle with flour and mist with oil. Loosely cover the dough rounds with plastic wrap and then allow to rest for 2 hours.

9. At least 45 minutes before making the pizza, place a baking stone on the lower third of the oven. Preheat the oven as hot as possible (500° F/260° C). NOTE: If you do not have a baking stone, then use the back of a jelly pan. Do not preheat the pan.

10. Generously sprinkle the back of a jelly pan with semolina/durum flour or cornmeal. Flour your hands (palms, backs and knuckles). Take 1 piece of dough by lifting it with a pastry scraper. Lay the dough across your fists in a very delicate way and carefully stretch it by bouncing it in a circular motion on your hands, and by giving it a little stretch with each bounce. Once the dough has expanded outward, move to a full toss.NOTE: Make only one pizza at a time.During the tossing process, if the dough tends to stick to your hands, lay it down on the floured counter and reflour your hands, then continue the tossing and shaping. In case you would be having trouble tossing the dough or if the dough never wants to expand and always springs back, let it rest for approximately 5-20 minutes in order for the gluten to relax fully,then try again.You can also resort to using a rolling pin, although it isn’t as effective as the toss method.

11. When the dough has the shape you want (about 9-12 inches/23-30 cm in diameter - for a 6 ounces/180g piece of dough), place it on the back of the jelly pan, making sure there is enough semolina/durum flour or cornmeal to allow it to slide and not stick to the pan.

12. Lightly top it with sweet or savory toppings of your choice.NOTE: Remember that the best pizzas are topped not too generously. No more than 3 or 4 toppings (including sauce and cheese) are sufficient.

13. Slide the garnished pizza onto the stone in the oven or bake directly on the jelly pan. Close the door and bake for abour 5-8 minutes.NOTE: After 2 minutes baking, take a peek. For an even baking, rotate 180°.If the top gets done before the bottom, you will need to move the stone or jelly pane to a lower shelf before the next round. On the contrary, if the bottom crisps before the cheese caramelizes, then you will need to raise the stone or jelly.

14. Take the pizza out of the oven and transfer it to a cutting board or your plate. In order to allow the cheese to set a little, wait 3-5 minutes before slicing or serving.


The Sauce: Mix pesto and Alfredo sauce and spread over the dough. This gave the pizza a rich, creamy base.
The Toppings: Arrange pulled cooked chicken and thinly sliced onion. I added variety by adding thinly sliced red bell peppers, sun dried tomatoes or basil. Top the pizza with a generous handful of mozzarella cheese, and sprinkle with salt and pepper.


Sweet Pizza
The Dough: Same as the savory recipe
The Sauce: 2 T. melted butter, 2 tsp. cinnamon. Mix and spread over crust
The Toppings: 3/4 c. brown sugar, 3/4 c. flour, 1 T. water, 1/4 c. softened butter, about 1 tsp. cinnamon, 1/3 c. oatmeal, 1/3 c. crushed almonds, thinly sliced strawberries. Set the strawberries aside, and mix all ingredients together. Add oatmeal as needed to get a crumbly texture. Sprinkle over the crust. Layer with sliced strawberries.
For an extra sweet touch: Mix 1/2 c. confectioner's sugar, 1/2 T. milk and 1/8 tsp. vanilla. Swirl the glaze on top of the pizza.
Note: It will smell delicious the second it comes out of the oven, but swat those hungry hands away because it tastes best once it has had time to cool down a bit.

Between the pizza, wine and good friends to share it with...a girl couldn't ask for much more!

Monday, October 27, 2008

Sweet and Savory Pumpkin

Okay, so it's no big secret that I love pumpkins. My husband jokes that he's never known anyone who uses all of the pumpkin for cooking, and he says that if I wanted to I could even find a use for the stem! With so many delectable recipes for cooking with pumpkins, it was hard to choose only a few. However, here are some of my favorites and some I've never tried but they looked so scrumptious they've made my list of must tries.

-Downeast Maine Pumpkin Bread
-Pumpkin Cake with Whipped Cream and Pecan Praline
-Pumpkin Cornmeal Muffins
-Spiced Pumpkin Seeds
-Pumpkin Cream Cheese Spread
-Pumpkin Whoopie Pies
-Penne-Wise Pumpkin Pasta
-Spanish Pumpkin and Bean Soup
-Pumpkin Cheesecake

Friday, October 24, 2008

The Most Important Meal of the Day

"'When you wake up in the morning, Pooh,' said Piglet at last, 'What's the first thing you say to yourself?'
'What's for breakfast?', said Pooh. 'What do you say, Piglet?'
'I say, I wonder what's going to happen exciting today?', said Piglet.
Pooh nodded thoughtfully. 'It's the same thing.', he said."
-A.A. Milne, Winnie-the-Pooh 1926

A short time ago I decided to take on a culinary challenge and attempt to make macarons. A foodie blog that I love, Tartelette, features these tasty treats quite often, and I thought that by following her skilled instruction I too may be able to make these challenging cookies. Well, my culinary adventure ended up being a culinary catastrophe! Instead of looking like Tartlette's puffy delights, mine looked like flat saucers.

But there is a happy ending for the creamy filling I had prepared. What was once intended to be sandwiched in the middle of the macarons, I used as a delicious topping to french toast. Since I rarely get to make breakfast in the morning, I enjoy serving it for diner from time to time.

I started by making homemade wheat bread. Bread sounds more intimidating than it should. If you have a good recipe it's fairly easy to make.

Whole Wheat Bread

1 pkg. dry active yeast

1 1/8 cup warm water

1 T. brown sugar

1 T. olive oil

1 1/2 cup whole wheat flour

1 1/2 cup white bread flour

1 tsp. salt

In a large bowl dissolve yeast in the water, add the sugar and let sit 5 min. until it starts to foam. Add the rest of the ingredients and stir together. Scrape onto a lightly floured surface and kneed for 8 min. adding more white flour as needed to get a smooth elastic dough. Transfer to a lightly oiled bowl and turn to coat. Cover with plastic and let sit at room temp. to double, about 1 hour. Punch, re-shape and rise to double, about 45 min.

Put in a lightly oiled loaf pan. Cover and rise to double, about 45 min.

Bake at 400 degrees for 30-40 min. Deeply colored and sounds hollow by tapping the bottom. Cool on rack.

I then cut the fresh bread into thick, generous slices. Soak each slice in a mixture of eggs, milk, a dash of salt and a dollop of maple syrup. Cook on a griddle until golden. Top each slice of french toast with a spoonful of Cream Cheese Buttercream filling.

Cream Cheese Buttercream

1 1/2 sticks (170 gr) butter at room temperature

4 oz (120gr) cream cheese, softened

3 egg whites1/2 cup (100gr) sugar

2 Tb water

1 tsp vanilla extract

In the bowl of stand mixer, whip the egg whites until they have soft peaks. In the meantime, combine 2 Tb water with the sugar to a boil in a heavy saucepan and bring the syrup to 250F. Slowly add the sugar syrup to the egg whites. Continue to whip until the meringue is completely cooled. Slowly add the butter, one tablespoon at a time. The mass might curdle but no panic, continue to whip until it all comes together. Add the cream cheese, the same way, a little at a time until everything is smooth. Whisk in the vanilla extract, or paste or bean.