Sunday, November 30, 2008

Daring Baker's Challenge - Caramel Cake and a Sugar High

Well friends, I successfully finished my second Daring Baker's Challenge. I was thrilled when I found out the challenge was Carmel Cake because of my love of anything caramel, and because it would be a perfect surprise for my Dad's birthday which was in November. If you can't stand the thought of eating another dessert after the smorgasbord of food consumed over Thanksgiving, then make the cake and give it to a friend just so you can experience the delicious smell of browned butter and caramel that fills your home. Thank you to our fabulous hosts for November's challenge: Dolores, Alex and Jenny .

The original recipe comes from Shuna Fish Lyndon. We were given quite a bit of freedom with the recipe, so I decided to make a layered 9 inch cake. I had also been warned about the sweetness level of this cake, so I made some alterations such as cutting down on the sugar content and adding salt.

The first step is to make the caramel. You'll end up having extra caramel left over, so you can use it for other tasty treats or use it to sweeten your morning tea.
Caramel Syrup:
-2 cups sugar
-1/2 cup water
-1 cup water (for "stopping" the caramelization process)

-In a small stainless steel saucepan, with tall sides, mix water and sugar until mixture feels like wet sand.
-Brush down any stray sugar crystals with wet pastry brush.
-Turn on heat to highest flame.

-Cook until smoking slightly: dark amber. (Boil about 6-7 minutes. Once you see a slight change of color, pay close attention because the sugar can burn very easily. I burnt my first batch by trying to reach too dark of a color. However, a darker colored caramel syrup will help cut the sweetness factor is the end product.)

-When color is achieved, very carefully pour in one cup of water. Caramel will jump and sputter about! It is very dangerous, so have long sleeves on and be prepared to step back. (I put a piece of foil with a hole in the middle over the saucepan to prevent any caramel from jumping out. this worked very well.)

-Whisk over medium heat until it has reduced slightly and feels sticky between two fingers. (The consistency should be like maple syrup.) {Obviously wait for it to cool on a spoon before touching it.}
Caramel Cake with Caramelized Butter Frosting:
-10 Tablespoons unsalted butter at room temperature
-1 1/4 Cups granulated sugar
-1/2 teaspoon kosher salt
-1/3 Cup Caramel Syrup (see recipe above)
-2 each eggs, at room temperature
-splash vanilla extract
-2 Cups all-purpose flour
-1/2 teaspoon baking powder
-1 cup milk, at room temperature

-Preheat oven to 350F

-Butter one tall (2 – 2.5 inch deep) 9-inch cake pan. (I used 2 9-inch cake pans, and divided the batter between the two pans.)

-In the bowl of a stand mixer fitted with a paddle attachment, cream butter until smooth.

-Add sugar and salt & cream until light and fluffy.

-Slowly pour room temperature caramel syrup into bowl.

-Scrape down bowl and increase speed.

-Add eggs/vanilla extract a little at a time, mixing well after each addition.
-Scrape down bowl again, beat mixture until light and uniform.

-Sift flour and baking powder.
-Turn mixer to lowest speed, and add one third of the dry ingredients.

-When incorporated, add half of the milk, a little at a time.
-Add another third of the dry ingredients, then the other half of the milk and finish with the dry ingredients. {This is called the dry, wet, dry, wet, dry method in cake making. It is often employed when there is a high proportion of liquid in the batter.}
-Take off mixer and by hand, use a spatula to do a few last folds, making sure batter is uniform.

-Turn batter into prepared cake pan. (if using two 9-inch pans, fill each half full.)

-Place cake pan on cookie sheet or 1/2 sheet pan.
-Set first timer for 30 minutes, rotate pan and set timer for another 15-20 minutes. Your own oven will set the pace. Bake until sides pull away from the pan and skewer inserted in middle comes out clean. (If using two 9-inch pans, cook for about 25 minutes.)

-Cool cake completely before icing it.
-Cake will keep for three days outside of the refrigerator.

Caramelized Butter Frosting:
-12 Tablespoons unsalted butter
-1 pound confectioner’s sugar, sifted (I cut this down to 3 cups.)
-4-6 tablespoons heavy cream
-2 teaspoons vanilla extract
-2-4 tablespoons caramel syrup (see recipe above)
-Kosher or sea salt to taste (Start with 1/2 tsp. and add to your desired taste)
-Cook butter until brown. (Browning the butter will cut down on the sweetness factor, and adds a flavor that is incredibly delicious!)
-Pour through a fine meshed sieve into a heatproof bowl, set aside to cool.
-Pour cooled brown butter into mixer bowl.
-In a stand mixer fitted with a paddle or whisk attachment, add confectioner's sugar a little at a time.
-When mixture looks too chunky to take any more, add a bit of cream and or caramel syrup.
Repeat until mixture looks smooth and all confectioner's sugar has been incorporated.

-Add salt to taste.
Note: Caramelized butter frosting will keep in fridge for up to a month. To smooth out from cold, microwave a bit, then mix with paddle attachment until smooth and light.

To assemble, place one layer of the cake on a cake stand. Drizzle with caramel syrup and place second cake on top. Smooth a thin layer of frosting over entire cake. Spread crushed almonds or pecans on top of cake, and decorate edges using a pastry bag and your favorite tip. Sprinkle a small amount of sea salt on top of nuts (the pairing of the savory salt with the sweet cake is a great combination). I placed the cake in the fridge and pulled it out just before serving. The result was a dense, cool cake that everyone loved.

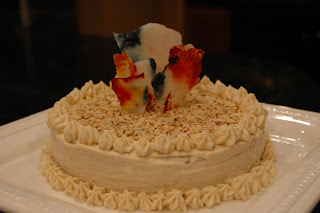
As I mentioned earlier, I made this cake for my Dad's birthday so I wanted to add an unexpected punch of color as a topper on the cake. Since so much of this cake is about playing with sugar, I decided to make Stained Glass Caramel from Tartelette to continue the sugar fun.

Stained Glass Caramel Windows:
-1 cup sugar
-2 1/2 Tb water
-various food colorings

-Line a baking sheet with parchment paper.
-Drop a few drops of food coloring onto the paper. Do not touch them, swirl them or move them.
-In a heavy saucepan, combine the sugar and water, do not stir and bring to a boil over high heat.

-Continue to boil until the caramel reaches the soft crack stage or 140C - 285F on a candy thermometer (do not let it turn color).

-Immediately pour over the parchment paper with the food coloring.

-Take the baking sheet with your hands and move it left to right, right to left to move and swirl the colors.

-Let set until completely cooled. Break pieces of your desired size to decorate the cake with. The stained glass adds a fun structural element to the cake. Overall, it was a hit and every last bit of browned butter goodness was gobbled up!

Thursday, November 27, 2008

Happy Thanksgiving!

(Photo Courtsey of Joseph Holodook)

Over the river and thru the wood,
To grandfather's house we go;
The horse knows the way
To carry the sleigh,
Thru the white and drifted snow, oh!

Over the river and thru the wood,
Oh, how the wind does blow!
It stings the toes,
And bites the nose,
As over the ground we go.

Over the river and thru the wood,
To have a first-rate play;
Oh, hear the bell ring, "Ting-a-ling-ling!"
Hurrah for Thanksgiving Day-ay!

Over the river and thru the wood,
Trot fast my dapple gray!
Spring over the ground,
Like a hunting hound!
For this is Thanksgiving Day.

Over the river and through the wood,
And straight through the barnyard gate.
We seem to go extremely slow
It is so hard to wait!

Over the river and through the wood --
Now Grandmother's cap I spy!
Hurrah for fun!
Is the pudding done?
Hurrah for the pumpkin pie!

Tuesday, November 25, 2008

Can You Capture Thankfulness in a Jar?


(Photo courtesy of Hub Pages)
To most it would look like an old Pringles jar wrapped in pretty wrapping paper...and they would be right, but to me and my family it's much more. This is our Thanksgiving Thankfulness Jar. It began a long time ago, and each year on Thanksgiving it's pulled out again and set in a place of prominence. Throughout the day guests write what they are most thankful for on small strips of paper. At the end of dinner we pass the jar around and take turns pulling the strips of thankfulness out and reading them aloud. Each year we add to the jar, so mixed in with our current thanks you'll find the things we were thankful for over the last 10 years. It becomes a beautiful time of remembering, gratitude and recognition of the many blessings in our lives.

Friday, November 21, 2008

Beachfront Wedding Weekend

(Photo courtsey of J. Garner Photography)
Remember this beachfront wedding I went to this summer? Well, I'm heading down to Portland tomorrow for another Oregonian wedding. Have a fabulous weekend my friends!

Thursday, November 20, 2008

Put Your Blessings Into Writing

Each of us is blessed in incredible ways, but often the things we should be thankful for go unnoticed in the busyness of life. Many years ago I started a thankfulness journal as a way to remember all that I have to be thankful for. At the end of the day I'll sit down and write out five things I have to be thankful from that day. Some days I have to think quite hard and may come up with something as silly as "My coffee tasted extra delicious this morning". Other days I have to pick the best of the best for my top five. Every now and then I'll flip through my pages of blessings. You can't help but feel overwhelmed with all of the blessings that have been poured on you.

Tuesday, November 18, 2008

Thanksgiving Tabletop

This year my parents are hosting Thanksgiving at the cabin. The entire extended family will gather in the cozy house, most likely with the snow falling outside and a blazing fire inside. My mom has asked me to help with the decorations, and given the rustic atmosphere we have decided to decorate using nature as our guide. Here is the inspiration board for this festive affair:


-I love using textures in design. The feathers bring a soft, elegant layer to the tabletop. View the pheasant feather centerpiece here and the place setting here.

-These place cards create the affect of falling leaves scattered across the table.

-Given that my maiden name is Johnson, the Johnson Brothers plates are perfect for a family gathering. My mom has a collection that has been in the family for years.

-This centerpiece is created with many layers. Carmel colored felt, rich satin ribbon, scattered leaves and a pedestal full of miniature pumpkins and gourds.

Monday, November 17, 2008

Giving Without Spending a Dime


(Photo courtesy of Flickr)
This season is all about being thankful for the blessings in your life, but it should also be a time of giving to those who are less fortunate than you. Unfortunately, in this tough economy it’s often hard to find the extra cash that most of us think is necessary to help those in need. Well I am here to tell you that you can help those around you without spending a dime! Here are few ideas:
1. Offer to rake the leaves in the yard of your elderly neighbor.

2. Volunteer at a soup kitchen. Operation Nightwatch, located in Seattle, is one that I have served at in the past.

3. Donate your old winter jackets to a shelter such as the Union Gospel Mission

4. Call local hotels and ask for donations of soap and shampoo to give to local shelters.

5. Schools are low on resources and many kids can't afford school supplies. Ask local retailers to donate supplies to a school in their area.

6. Volunteer! Find a program that fits your gifts and your passions, and serve!

Here are some of my favorite Seattle volunteer and donation opportunities: Treehouse, Ronald McDonald House, YMCA, Agros International, Seattle Children's Hospital, World Concern

Thursday, November 13, 2008

Comfort Week - All Time Favorite Comfort Food

(Photo Courtesy of Martha Stewart)
What is "comfort week" without some comfort food?! Well today I'm going to share my all time favorite comfort food recipe with you, but I'm cheating a little and not using a picture I took myself. I made this meal recently, but it was eaten before I took any pictures! Yes, it's that good!


by Rachael Ray

Ingredients:
1 pound macaroni with lines, such as tubatini or mini penne rigate
Salt
1 tablespoon extra virgin olive oil, 1 turn of the pan
2 tablespoons butter
1/2 medium onion
2 tablespoons chopped fresh thyme leaves, plus a few sprigs for garnish
3 tablespoons all-purpose flour
2 cups chicken stock
1 box frozen cooked butter nut squash (10 ounces), defrosted
1 cup cream or half-and-half
2 cups sharp cheddar (8 ounces), grated
1/2 cup grated Parmigiano Reggiano, a couple of handfuls
1/4 teaspoon ground nutmeg, eyeball it
Black pepper

Preparation:
Heat a pot of water to boil for the pasta. Salt the water then add the pasta and cook to al dente or, with a bite to it.
While pasta cooks, heat a medium heavy bottomed pot over medium heat. Add the EVOO and butter. When the butter melts into the oil, add the thyme and grate the onion directly into the pot with a hand held grater or Microplane. Cook the grated onion in butter and oil 1-2 minutes, then add flour and cook together 1-2 more minutes. Whisk in stock, then combine with butternut squash until warmed through and smooth. Stir in cream or half-and-half and bring sauce to a bubble. Stir in cheeses in a figure 8 motion and season the completed sauce with salt, nutmeg and pepper. Taste to adjust seasonings.
Drain cooked pasta well and combine with sauce.

Note: I make a few changes to the recipe. I use basil rather than thyme and add cooked chicken. I also add a variety of veggies I have on hand such as mushrooms or zucchini.

In Rachael Ray's words "Yum-o!"

Tuesday, November 11, 2008

Comfort Week - Candlelight

This week we are talking about comfort, and one of my favorite comfort items is candles. There is something incredibly soothing to me on a cold rainy day to light a few candles throughout my home.

Skeem is a line of candles that I absolutely love. They come in beautifully designed, silk-screened glass containers that are filled with a soy/paraffin wax blend. I haven't found a scent that I don't like! My favorite is Clove Pomegranate. The best part is that after the candle has been fully enjoyed, the container can be used as a drinking glass.

(Photo courtesy of Skeem Design)

If tea lights and votives are more your cup of tea, then check out Glassybaby. This company is run by fabulous people who have a passion for beauty and design. Each candle holder is hand blown, and the are available in about 70 different colors. If you live in the Seattle area then you should check out their store and studio in Madrona. You can watch as the talented artists create these unique pieces of art. They have also recently opened retail space in University Village and Bellevue Square!

(Photo courtesy of Glassybaby)

Monday, November 10, 2008

Comfort Week - Heating Pad How-To

As the weather starts to turn colder, I'm always looking for a way to get extra warm and cozy. I love wrapping a heating pad around my neck after a long day at work. However, I've never found one in as stylish a fabric or that smelled as good as the one I made. It may look complicated, but it can be accomplished in a few easy steps.

What you'll need:
-fabric (about 1/2 a yard)
-sewing machine
-iron
-thread and needle
-scissors
-rice
-your favorite essential oil (I chose lavender)


How to:
1. In a large bowl, mix rice with your essential oil. Add as much or as little oil as you prefer. Remember that the oil will smell stronger when you heat it up.

2. Fold the fabric in half (right sides together) and cut to your desired size. Note: I made mine bigger because I intended to use it more for my back rather then my neck.

3. Sew one short side and one long side with a 1/4" seam allowance.

4. Press seams apart and clip corners

5. Turn right side out.

6. Fill bag about 2/3 way with rice and essential oil mixture.

7. Hand sew the top to close.

Heat in the microwave for about 30 seconds to 1 minute and begin to relax.

Saturday, November 8, 2008

I Love Dirt!


While in Maine I stumbled upon a boutique that was absolutely full of creative and unique merchandise. The book "I Love Dirt!" by Jennifer Ward caught my eye. It gives a fresh approach to getting your kids into the great outdoors. Its pages are packed with activities and conversation starters aimed at teaching your kids about nature and how to be good stewards of our surroundings. It is tailored for little ones, so if your kids are under ten you need to add this book to your must read list.

This book can be purchased at Amazon.com.

Friday, November 7, 2008

All The Colors Of The Rainbow

(Photo courtesy of Ohdeedoh)
I love, love, LOVE this room! It has such a perfect mix of old and new, traditional and modern, bright colors and neutral. It inspires me to look at flea market/thirft store finds in a new way. So creative!

Thursday, November 6, 2008

The Big Ugly Desk Chair

My guest room is full of relaxing, soothing tones of beige, pale sage green, warm pinks and blues. It is a tranquil place that I love welcoming guests into. However, since we live in an apartment my guest room is also the office. So sitting at the desk, smack dab in the middle of the room is a big black ugly desk chair. I have been contemplating my design options, but with a tight budget getting a new chair is not in the cards. Then I came across this post from Apartment Therapy's Re-Nest.
They have completely transformed a plain old office chair into a much more stylish and chic version. All they have done is recover the existing chair with new modern fabric. I'm thinking I may need to make a trip to the fabric store!

Tuesday, November 4, 2008

Monday, November 3, 2008

Everyday Beauty

Something that I have come to love through my photography is finding beauty in the little details that are all around us everyday. It's easy to find beauty in nature, but what about in a city. There is so much beauty surrounding us, but often we fail to see it because we get consumed in the task at hand. Inspiration can be found in creative architecture, graffiti on a brick wall, or black metal grating on a city street. Thanks to Coco+Kelley for sharing a great project who's mission is calling after my own heart.

Urban Curators was started by six students who find inspiration in the unexpected. "The goal of the Urban Curators project is to engage the public in the celebration of the decaying urban environment, recognizing its inherent aesthetic qualities as well as the important role that it plays within our cultural habitat." (Urban Curators Mission Statement)
They have invited you to join in and take pictures of your own city. Even if you don't "frame" and photograph the city around you, do take the time to appreciate it as a form of art and beauty.